Cryptic SD cards definition explained at last by Explora.

SD_cards

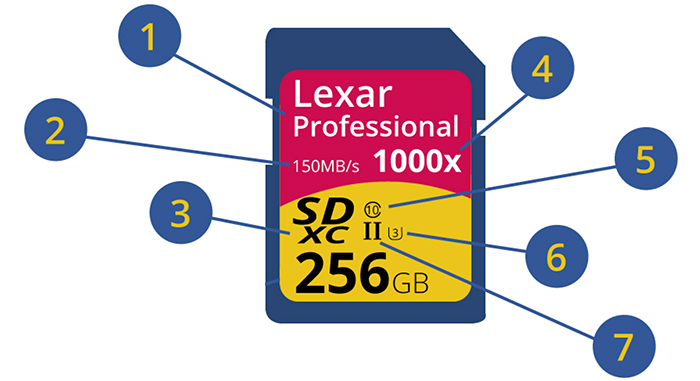
If you ever wondered what all those SD card numbers and definitions mean than jump over at Explora (Click here). If you don’t have time to read the full article here is the shupershort explanation:

  1. Name: some card manufacturers identify their card by the targeted user; in this case, the Lexar Professional series is aimed at photographers and videographers.
  2. Read Speed: the speed at which data is read from the card.
  3. Type: as mentioned above, this will either be SD, SDHC or SDXC. Differences in capacity or speed are shown elsewhere on the card.
  4. Another speed rating, which can be calculated into MB/s with this formula: x rating/6.6666 = MB/s. 1000 ÷ 6.666 = 150 MB/s
  5. Class rating: this is the minimum sustained data writing speed, and class 10 is the highest right now, capable of 10 MB/s. The slowest rating is Class 2, which has sustained data writing speeds of 2 MB/s.
  6. UHS Rating: The UHS rating and the Class rating are closely intertwined. UHS rating of 1 means that the minimum sustained data writing speed is 10 MB/s, and UHS 3 is 30 MB/s. However, the UHS rating is more important for shooting 4K video, as the minimum data rate must be higher so frames are not dropped. For photographers, a UHS 1 and a Speed Class 10 is basically the same thing; however, the UHS cards are more effective in a device that supports UHS bus architecture, and not all devices do. So conceivably, you could have a Speed Class of 10 and a UHS 3 rating, but without a UHS device, it defaults to the speed class rating of 10.
  7. This number shows what UHS standard this card conforms to—I or II. There are four bus speeds for memory cards: Normal, High, UHS I (Ultra High Speed), and UHS II. This number shows what the bus architecture of the card is. These classifications were designed for theoretical jumps in speed, and added as the cards got bigger. There is no difference to the end user between a UHS I or UHS II card.

Weekly 43rumors readers pictures roundup.


Nagy Barna
Panasonic G3 + SIGMA 60mm F2.8 DN Art

1) You can share your pics by using the message box on our 43rumors Facebook page (Click here).
2) All 43rumors readers pictures can be seen here: facebook.com/43rumors/photos. Like the pictures you like and chat with the authors if you want to know how they took the shot!
3) The most liked pictures and some pics selected by myself will be posted weekly on 43rumors

This is the weekly selection:

Read more

a bit of everything…


Olympus OM-D E-M5 Mark II MFT Camera Video Review

Review of Olympus Firmware 3.1 now available at Furnfeather.
40-150mm PRO lens review at Toolsandtoys.
Panasonic and Leica (Soundimagesplus).
8mm PRO lens test by D-Pixx.de.

Stephen:Looks like there might be a design or manufacturing problem with the E-M5 II LCD screen.  Mine seems to have failed after a couple of days of almost no usage, and I’m not the only one: http://www.dpreview.com/forums/thread/3813148#forum-post-55466632

Rojocinco:I want to show a time-lapse made with a GH4, it´s a sunset in Bilbao: https://youtu.be/Xx0j6wS3hJY

a bit of everything…


Olympus ‘Pro’ wideangle lens Field Test: Rock n’ Roll and Skateboards (Dpreview).

Olympus M.Zuiko 7-14mm f/2.8 PRO review at Admiringlight.
48 Hours with the Olympus OM-D E-M5 Mark II (LessGearsMorePhotos).
Jordan Drake from The Camera Store tells us about his week & Canon BASHING! (Brutoncoxvisuals).
Test Panasonic G7 at Focus Numerique.
E-M5 Mark II + EF 40mm F2.8 STM (DC.watch).

Amadeusz:It’s just a small thing, but I figured it might be interesting – some time ago I had a chance to test the Voigtlander 10,5mm/0,95 on the JVC GY-LS300. I accidentally took a shot of a test chart at f/0,95 using the entire Super35 sensor area of the JVC. Here it is http://videodslr.pl/wp-content/uploads/2015/08/040G0021.MOV_snapshot_00.05_2015.08.02_00.18.19.jpg
It obviously doesn’t cover the entire S35 sensor wide open. The situation got a bit better after stoping down (no samples to prove it, sorry) but I still would not recommend this combination.
On the other hand, the Voigtlander 42,5/0,95 which I used specificly to test the camera covers the Super35 easily. Here’s a sample at around f/4:
https://youtu.be/JGfoshhySrM?t=36s

Dario Viola:https://vimeo.com/118917359 Panasonic GX7

a bit of everything…


Olympus 40-150mm f2.8 Pro review

Olympus Stylus SH-2 Review (ePhotozine).
panasonic gx8 : première vague de mises à jour pour les optiques (Lemondedelaphoto).
Sind Objektivadapter ein sinnvolles Zubehör oder doch nur ein Notbehelf? (Abenteuerdslrfotografie).
New Ulysses case for the E-M5II (DC.watch).

Florian:it is not a rumor, but rather the report of an incredible experience of customer friendliness of Panasonic: Since I destroyed my old GH1 just before our holiday, they loaned a GX8 to me. I have been using it for two weeks in the Swiss mountains and have started posting  some of my experiences and photographs here (more will follow): http://www.blog.floriansphotos.com/search/label/GX8%20adventure

Aaron:Not a rumor, but a color enhancing tip for the GH4. I shot this with Portrait Profile and added and Arri Alexa SL LUT in Premiere CC. I immediately noticed how the colors were brought to life in a more realistic palette. https://vimeo.com/135872969

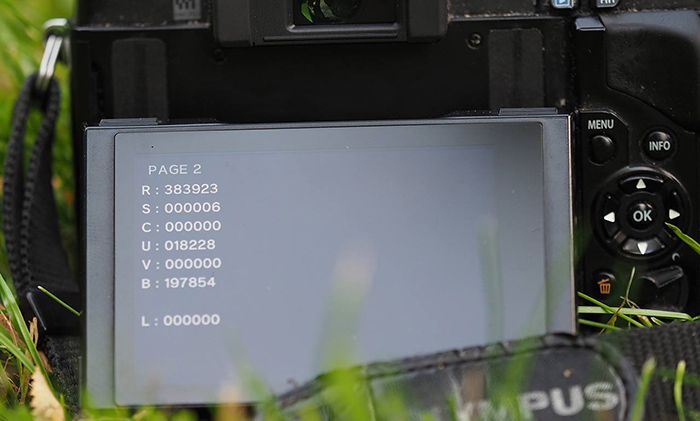
There is a “secret code” to see this on your Olympus camera…

11807388_964074940282389_8563762939363095388_o
Olympus Russia posted that image of an OMD camera. They say there is a “secret code” to activate some additional info about the camera. UPDATE. Here is the procedure to display that info:

1. With a charged battery installed hold down the MENU button while switching on the camera.
2. When the LCD lights release the MENU button and immediately press it again, once.
3. In the menu go to SPANNER (line 5) and press RIGHT.
4. Press DOWN until you are at the LCD brightness screen (line 3).
5. Enter the brightness screen (shows twin adjusters) by pressing RIGHT and then press INFO and OK sequentially.
6. You will see on the LCD ‘OLYMPUS’ followed by the designation of your camera (eg E-P1).
7. Press in sequence UP, DOWN, LEFT, RIGHT, SHUTTER and UP for screen 1.
8. You are now in the hidden information screens: RIGHT = screen 2, DOWN = screen 3, LEFT = screen 4.
9. When you have your information simply switch off the camera.

This is the info you get:

PAGE 1:
•B
•U
•C
•A
•L
•F
•M
I believe these number sequences are relating to the various firmware versions of the different controller boards in the camera and for further information please look at the same section for E-System cameras above.

PAGE 2:

•R: Shutter RELEASES (number of)
•S: FLASH fires (number of)
•C: ?
•U: USF (Ultra Sonic Filter) number of times it is driven by user and by automatic control of the camera is counted.
•V: ?
•B: Number of shots taken with IBIS switched ‘ON’ (Confirmed by Guy Parsons).
•L: ?

PAGE 3:

•CS: Serial Number; this should match the serial number on the bottom of the camera body.
•MCS: Main CPU Serial Number, Model No, Year and Month of manufacture.
•CSD: (From E-PL1 onwards) Relevance unknown.

Found by Dave on Biofos.