Using the Olympus E-M5 Mk II as a film ‘scanner’ (Guest Post by JL Williams).

Using the Olympus E-M5 Mk II as a film ‘scanner’
by JL Williams (jlwilliams-us.tumblr.com)
If you’re a long-time photographer (like me) you may have lots of old (and not-so-old) film negatives that you’d like to bring into the digital age. But if you’re an impatient photographer (like me) you probably haven’t made much progress!
That’s because scanning negatives into digital files has always been a PITA, no matter how you do it. Sure, you can farm the job out, if you don’t mind sending irreplaceable negatives off to parts unknown. Or you can buy a scanner and do it yourself… but cheap scanners produce, well, cheap results. Better scanners are slow, inconvenient, and require a lot of post-scan touchup — especially if you’re scanning silver-based black-and-white film, which defeats the “auto-fix” routines that many scanners promise.
(Quick explanation of why: color neg and slide films, by design, transmit infrared light, so they won’t heat up during enlargement or projection. That lets the scanner distinguish between a small detail and a small chunk of dirt on the neg… a small detail will transmit IR, but a chunk of dirt won’t. Silver-based films, on the other hand, block infrared, so the scanner can’t tell details from dirt.)
So when the Olympus E-M 5 Mk II camera was announced, with its clever sensor-shifting “high res shot” mode, plenty of us wondered if we could use this feature to get 40-megapixel JPEGs (or 64-megapixel raw files) of film negatives. For many types of subjects, high res shot mode is pretty limited, because it requires the subject to be absolutely motionless during its eight-exposure cycle — but that shouldn’t be a problem when copying negatives, right?
So I tried it. Here’s what I found:
Building the Rig
I decided to test using a medium-format black-and-white negative, since these are capable of excellent digital quality but are often problematic to scan.
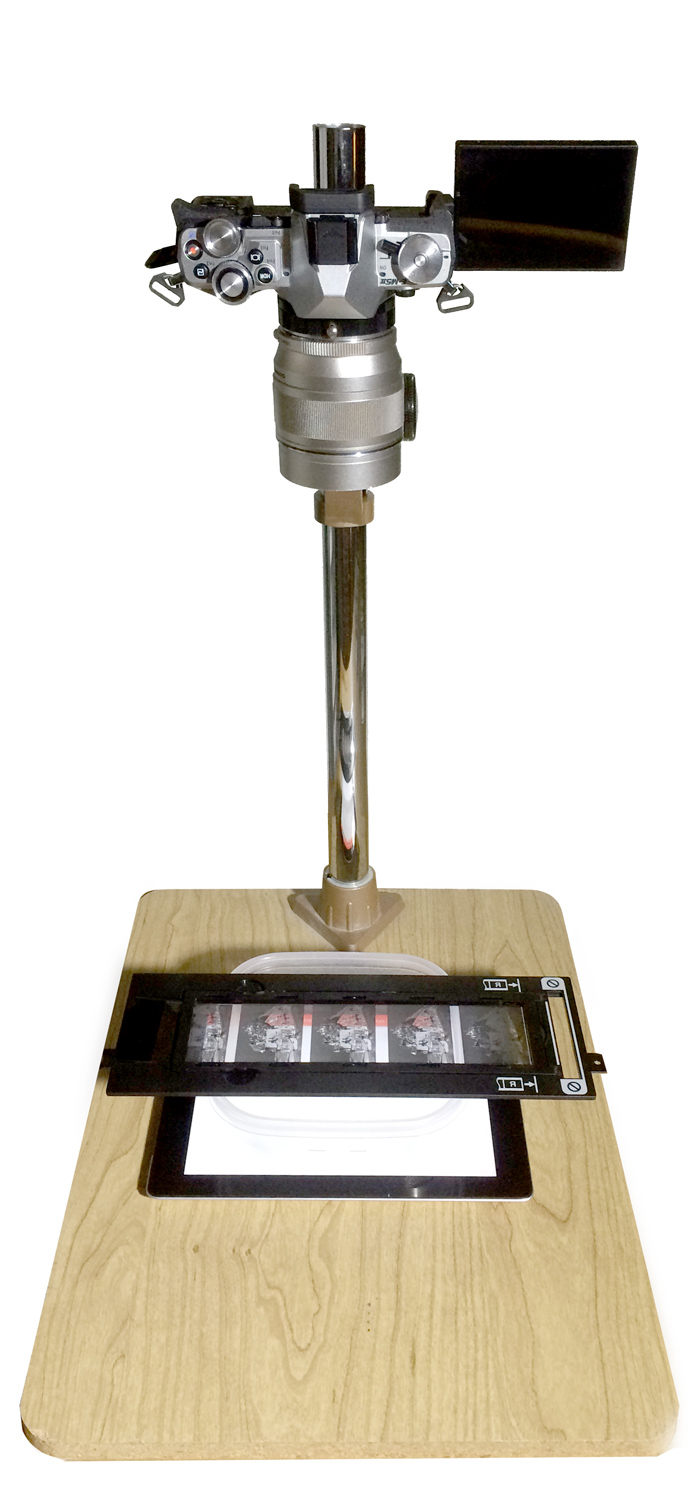
Building a rig to photograph these negs with the E-M 5 Mk II would have been easy if I owned a macro lens — but I don’t, and I didn’t intend to buy one until I was sure this process would work! So instead I had to cobble together a macro setup using some inexpensive, generic, non-coupled extensions tubes I happened to have. Even the shortest extension available with these tubes was too long to cover a full 6x6cm negative with most of my lenses; the only one that would work was my 75mm f/1.8 Olympus, an excellent lens for general photography, but not necessarily ideal for macro shooting.
Another problem was that since my extension tubes aren’t coupled electronically to the camera, I couldn’t just set the lens to my desired aperture and focusing distance. Instead I had to resort to an old trick: mount the lens directly on a camera, use the manual focus and DOF preview to get the settings I wanted, and then immediately remove the lens without turning off the camera. This trick let me mount the lens on the extension tubes without losing my previous settings.
I mounted the camera on an old-fashioned copy stand I happened to own, and the photo part of the setup was done.
For illuminating the negs, I had the idea of using my iPad. Sure, there are lots of less expensive and probably brighter ways to do this, but I already had the iPad, and it can generate a large area of bright, even light. Several free apps are available for turning it into a lightbox; I used one called Leuchtpult LT.
I placed my test film into the medium-format film holder that had come with my scanner, and laid it on top of the iPad. Problem: the distance between the film and the iPad was so short that the iPad’s individual LEDs were within the plane of focus, causing a grid pattern to appear behind the image.
Solution: I put a translucent plastic refrigerator container on top of the iPad, and laid the film holder across that. Sounds crude, I know, but it worked perfectly! The plastic container separated the film enough from the iPad that no patterns were visible. And unlike a flatbed scanner, this setup leaves absolutely NO glass surfaces near the film plane — so, far fewer dust and cleaning headaches.
Shooting the Tests
‘Scanning’ with the camera
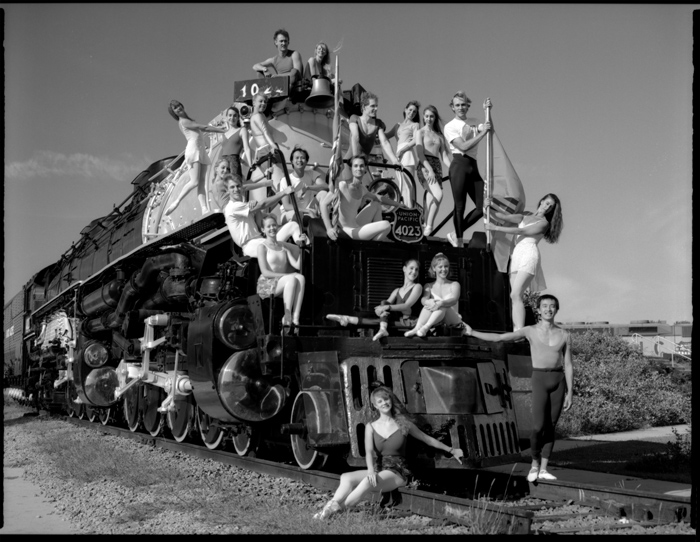
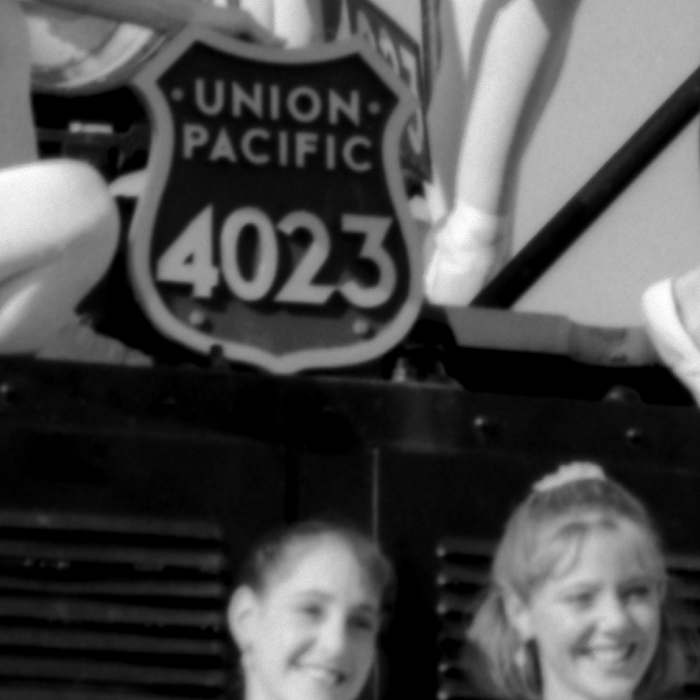
To test the setup, I chose a black-and-white negative I had made in 1993, using a Bronica 645 camera. It showed the members of the Ballet Omaha dance company perched on a Union Pacific “Big Boy” locomotive (long story…) and contained a wide range of tones and lots of detail.
I focused the E-M5 Mk II on the negative using its 10x magnified critical focusing view and the swiveling LCD viewfinder. Focusing on the grain structure of the film was easy at this magnification. I adjusted the exposure by using the viewfinder’s “blinkies” feature, which highlights over- or under-exposed areas, picking a midrange value that avoided blinkies at either extreme.
The Mk II’s high res shot mode requires the camera to be very still, and I really should have used a remote release to trigger it. I didn’t have one handy, so instead I set the camera to wait 8 seconds before starting the high res shot sequence. After the 8-second delay was up, it took the camera only a few seconds to make and assemble the high res shot. Since high res shots use the electronic rather than the mechanical shutter, the process was eerily silent.
I had chosen the raw+JPEG option, so I came away with both a 16.7mb JPEG file and a 104.5mb Olympus ORF raw file. I opened the raw file in Adobe Photoshop CC 2014, using Olympus’ recently-released High Res Shot Raw File plug-in.
Comparison scan with a flatbed scanner
After making the camera shot, I transferred the film holder to my Canon 8800F flatbed scanner and launched Hamrick Software’s Vuescan to perform a scan. I used the scanner’s full 4800-pixel-per-inch resolution setting and saved a 179mb TIFF file.
To compare the two images on an equal basis, I downsampled the scanner image to match the camera’s 6560-pixel width. This left me with two approximately-61-megapixel images to compare.
I didn’t spend much time optimizing the highlight and shadow values, since at this stage I was mostly interested in detail and sharpness. Both images had plenty of latitude for adjustment, and I’m sure I could have gotten similar tonal ranges from both.
The results
Let’s have some fun: Instead of telling you my conclusions first, I’ll show you the images and then reveal which came from where. Both are pixel-for-pixel crops of the locomotive’s number plate:
Image A
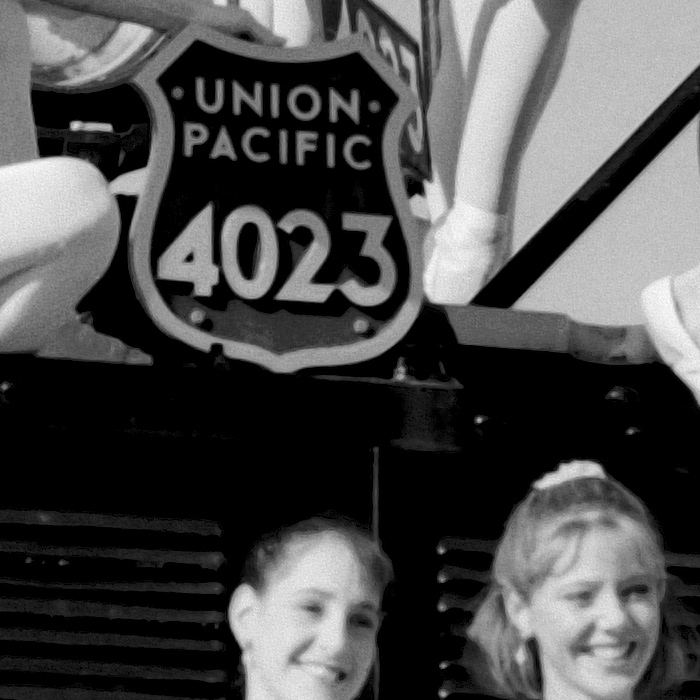
Image B
So, what do you think?
Would you be surprised to know that Image A came from the E-M 5 Mk II? It did!
Even with my improvised copying setup and non-optimized, non-macro lens, the camera copy (to my eyes) yielded a much sharper-looking, more-detailed result than the scanner copy.
What’s more, the full-size camera image had much less dust and required much less cleanup than the scanner image. That won’t surprise darkroom old-timers: a scanner shines a concentrated beam of light through the film, much like a condenser enlarger — and condenser enlargers were notorious for exaggerating dust, grain, and scratches. My copy stand rig, with its wide, diffuse light source, was more like printing with a diffusion enlarger — much more forgiving of negative defects.
The time difference was striking as well. I could clean, position, and expose a negative in the copy stand in less than 30 seconds, while the scanner took more than six minutes exclusive of prep. If you’re scanning all the frames on a 12-exposure roll (for example) that’s the difference between a 10-minute job and more than an hour of labor.
Of course I’m sure there are better, faster scanners than my Canon 8800F — and if you have one of them, good for you. But if you have an “average” scanner like mine, and if you’ve been considering the E-M 5 Mk II, the ability to make high-quality ‘scans’ with it is a nice additional bonus to take into consideration when deciding whether or not to buy.
–
E-M5II store links:
E-M5II in Black at Amazon, Adorama, BHphoto and GetOlympus.
E-M5II in Silver at Amazon, Adorama, BHphoto and GetOlympus.
E-M5II In Europe at AmazonUK, Jessops, WexUK, Namencolor.