Readers stories: Yasuhara Nanoha X5 – First experiences by Roberto

If you have a nice story you want to be posted on 43rumors send the full article at 43rumors@gmail.com.
Today 43rumors reader Roberto posts that extremely long and detailed Yasuhara Nanoha X5 MFT lens test. This lens costs $499 (at BHphoto) and isn’t certainly a lens for the mass. But you can do some great things with it! So click on the link below to read the full test.

I was lurking around this “special” lens for some time now, but except for a few bits of information and picture samples on the web there was hardly anything in-depth about the Yasuhara Nanoha, or so it would seem. Hence I had no other choice than to buy and test it for myself ;)
The specs on paper were just all too tempting:
– 5:1 macro ratio (magnification) – even if you take the m4/3 crop factor into account, it ́s very impressive! – built-in light source (3 LED ́s)!
– very compact design
– native micro4/3 mount
– competitive price…
Then, a few weeks ago, Thierry of Yasuhara France-Benelux sent me a mail with good news about the Nanoha currently again being in stock, and due to the Yen exchange ratio at a very decent price. Of course I had to say yes… ;) After a week I was able to welcome the new lens and do a little testing – my first victim being a flat ironed 5 Euros bill.

All images © 2013 roberto23@web.de – Yasuhara Nanoha is a copyrighted trademark, used here only to review the lens.
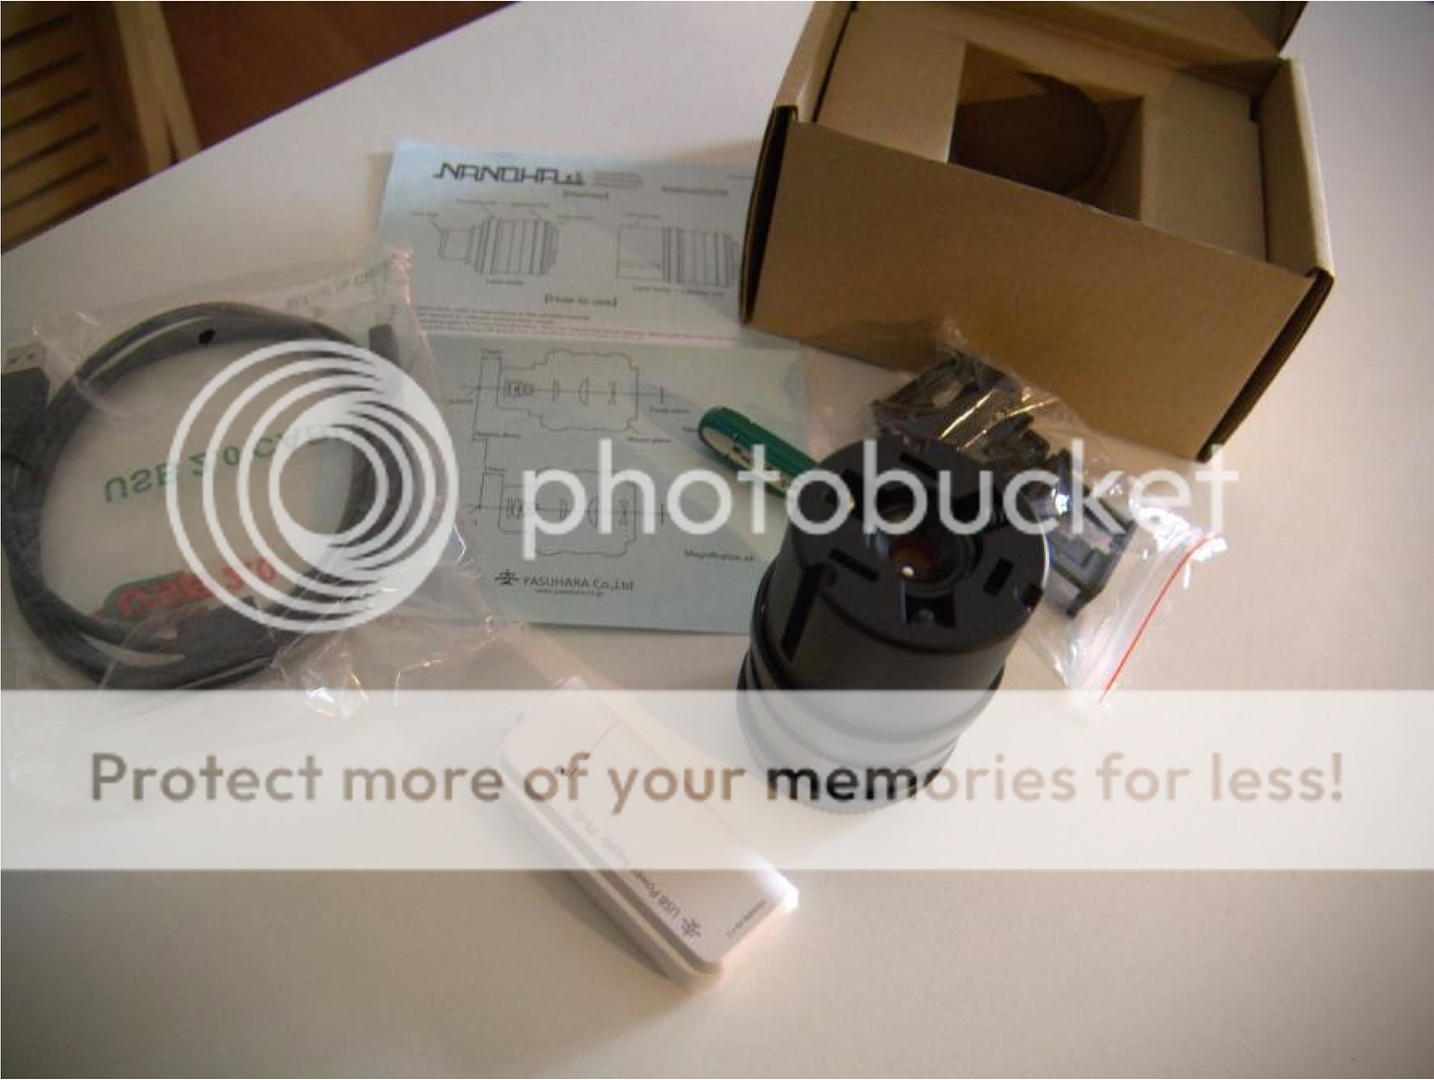
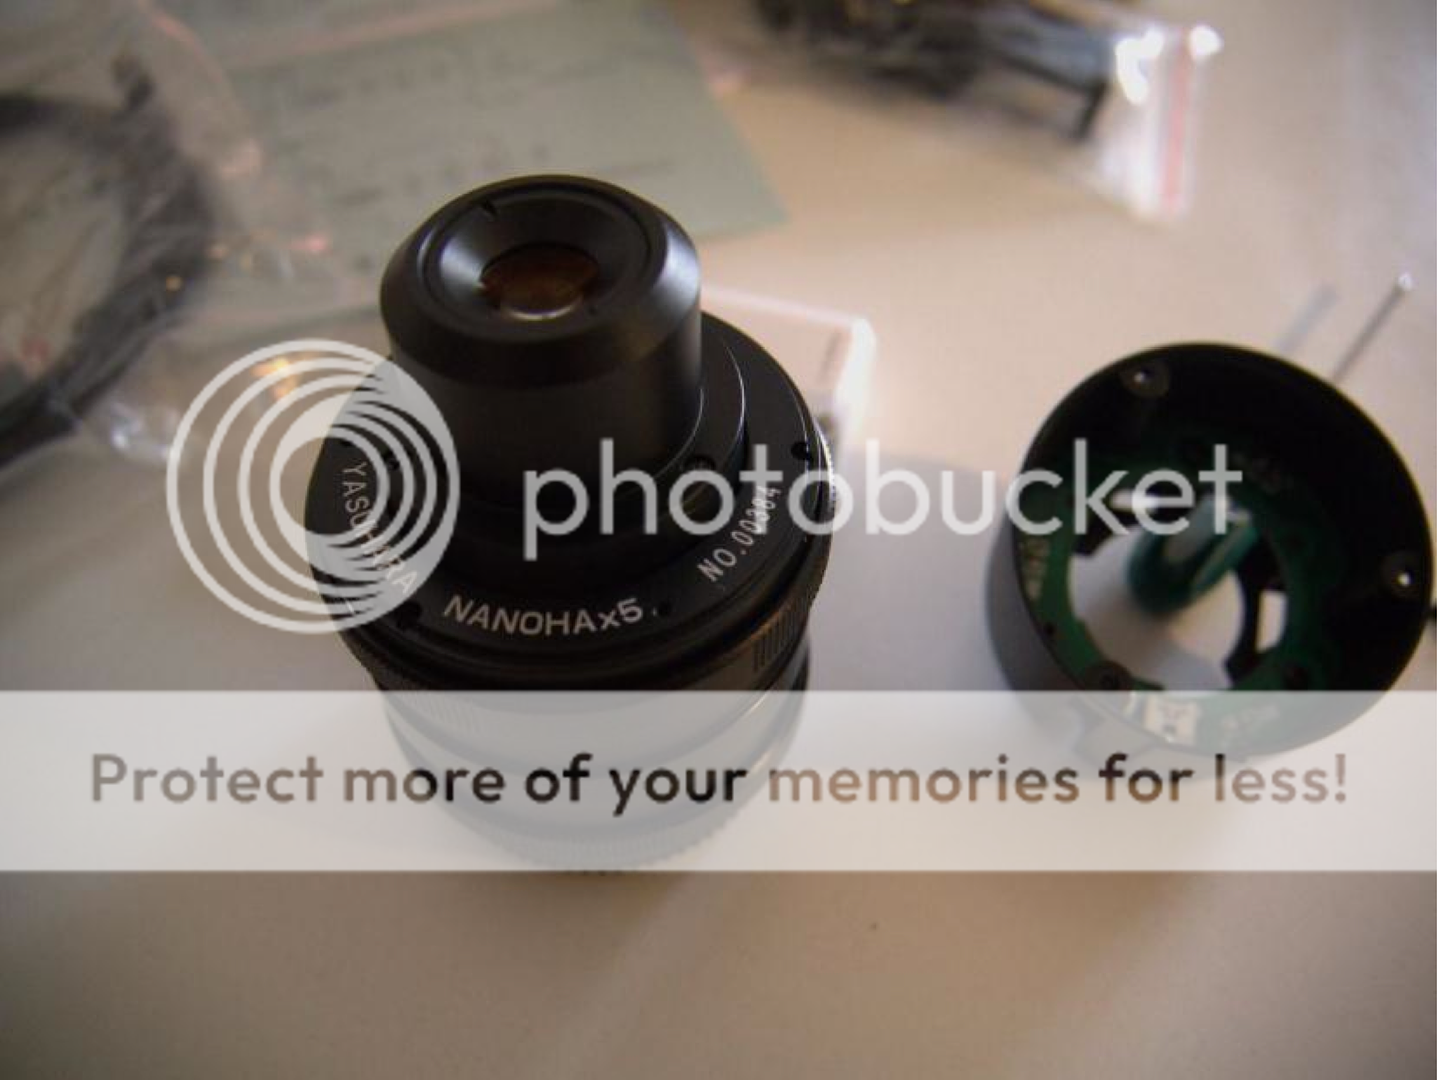
The lens was exquisitely well packaged, which I take as a charming sign of the family enterprise character of the manufacturer Yasuhara. These lenses are being crafted thoroughly handmade, mine carries a serial number as low as only 384!

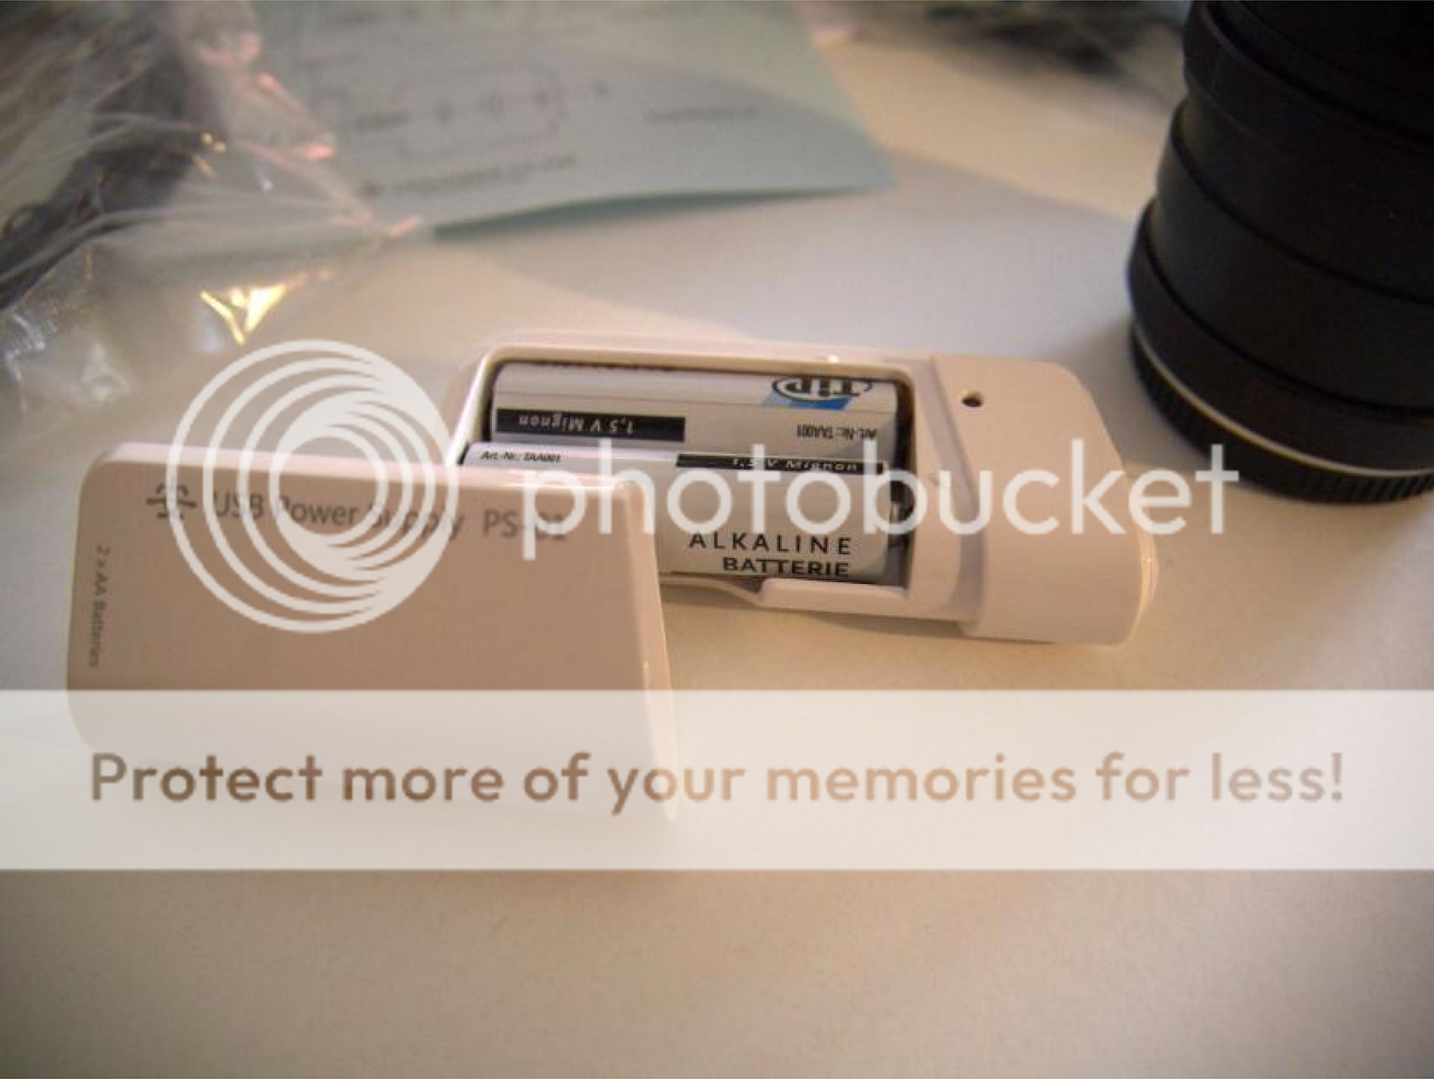
Even upon unpacking, the impression of careful manufacture work remains. Next to the lens itself, there is an (English) instruction page, a screwdriver to open/unscrew the lighting body from the lens, which is connected via an (included, of course) USB cable to a separate light source (which is a nice touch, because this way one does not need a PC to power the LED ́s up). The light source itself is a small, high-quality battery station with USB output and works with 2 simple AA batteries. The set concludes with 4 plastic attachments to be used as a carrier or spacer for the exhibits.
The lens resp. the light unit has the USB connection only for powering purposes.

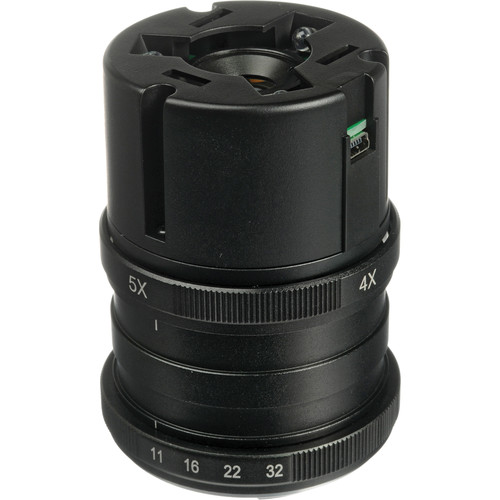
On the previous picture, the inscription 4X – and about 90 ° further to the right then 5X – are the settings for maximum magnification. It should be noted that during focusing, the front lens (already about 1 cm deep hiding inside the lighting cage) must only be between 11 to 19 millimeters away from the object! So this is definitely not like an ordinary Macro lens, where the observer has to be (or can be…) sometimes even a meter away from the bees and spiders! It is more like a microscope in this perspective, built to get objects the size of 1-2 mm into the picture, and such an object must be no more than 1-2 cm away from it!
Back to the lens – the mount is a native micro4/3, made of solid metal. The Nanoha is by the way also available for the Sony NEX and even the Canon EOS-M ((oddly enough, as I consider that system a joke, at least for now).

Unscrewing the lighting unit, you can see the resemblance of the Nanoha to a microscope lens structure. In addition, the serial number is revealed ;)
The upper part of the lens is concave, i.e. curved inward, which makes it possible to put the lens (including its “lighting cage”) completely on a flat table, and you don ́t have to worry about scratching the glass surface with the (flat) exhibit, even if you completely reach the underground.
By the way, this “standing by itself”-procedure has proved to be much more reliable as my attempts with an inverted tripod. The latter vibrated too much – whereas the setup with the Nanoha standing on its own, only stabilized by the weight of my Lumix GH3 above it delivered razor-sharp images even and especially at long exposure times!
But I ́m spoiling now. Let ́s have a look at the USB battery adapter first:
And here comes the lens with one of these plastic attachments – to be used both as carrier (ideal for 3-dimensional objects, such as flies) and a spacer. There are 4 of them in the package, just in case you lose some. (I could leave a remark here regarding Olympus’s policy in terms of lens pouches, caps, hoods etc. but eh… never mind)

So, after a long preface now it ́s time to talk about images… ;)
All pictures have been made with the GH3 at ISO 100, untouched except for resizing.
First, a cut through the section of a pineapple leaf (you know, that hard, sharp thingy on the top of the fruit). Sorry, it was the first best thing coming handy…

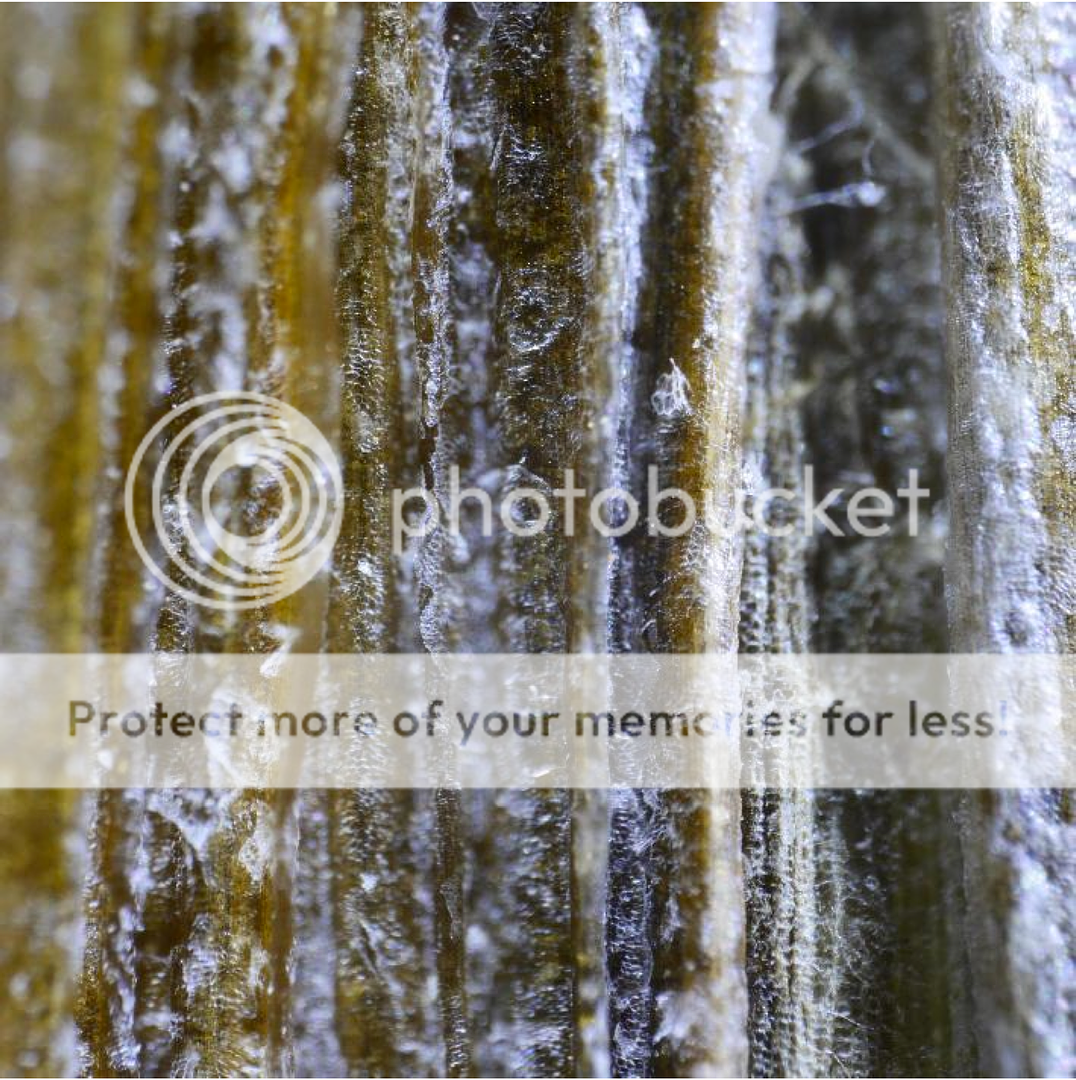
Then some fibers from our bamboo table sets – these things that are on the kitchen table beyond the plates. Size of the rods is about 1 mm, about 4 of them fitting on the image here. I apologize for any bread crumbs, I thought our kitchen is much cleaner than this…
Then a picture of a piece of metal in a stone – I had no idea there was a lost fiber on it, to the eye it was almost invisible:

In this picture you can see, how and why three-dimensional objects represent a major challenge for a macro or microscope lens! The lighting unit was up the task, and throughout the shooting session I had little to none flaring or any lighting disturbances. Also, the 3 small bright LED ́s appear to be optimally adjusted in height, because the illumination was always perfect.
Problems with depth and (un)sharpness of the image you can usually solve with higher aperture. The Nanoha has four fixed aperture values: 11, 16, 22 and 32. The higher I turned it, the more could move sharply into focus. But there are limits as you can see pretty well in that image above.
Back to the images – here comes the end of a bristle brush. The image area covers about 2-3 mm.

And my 2 cents to the story:
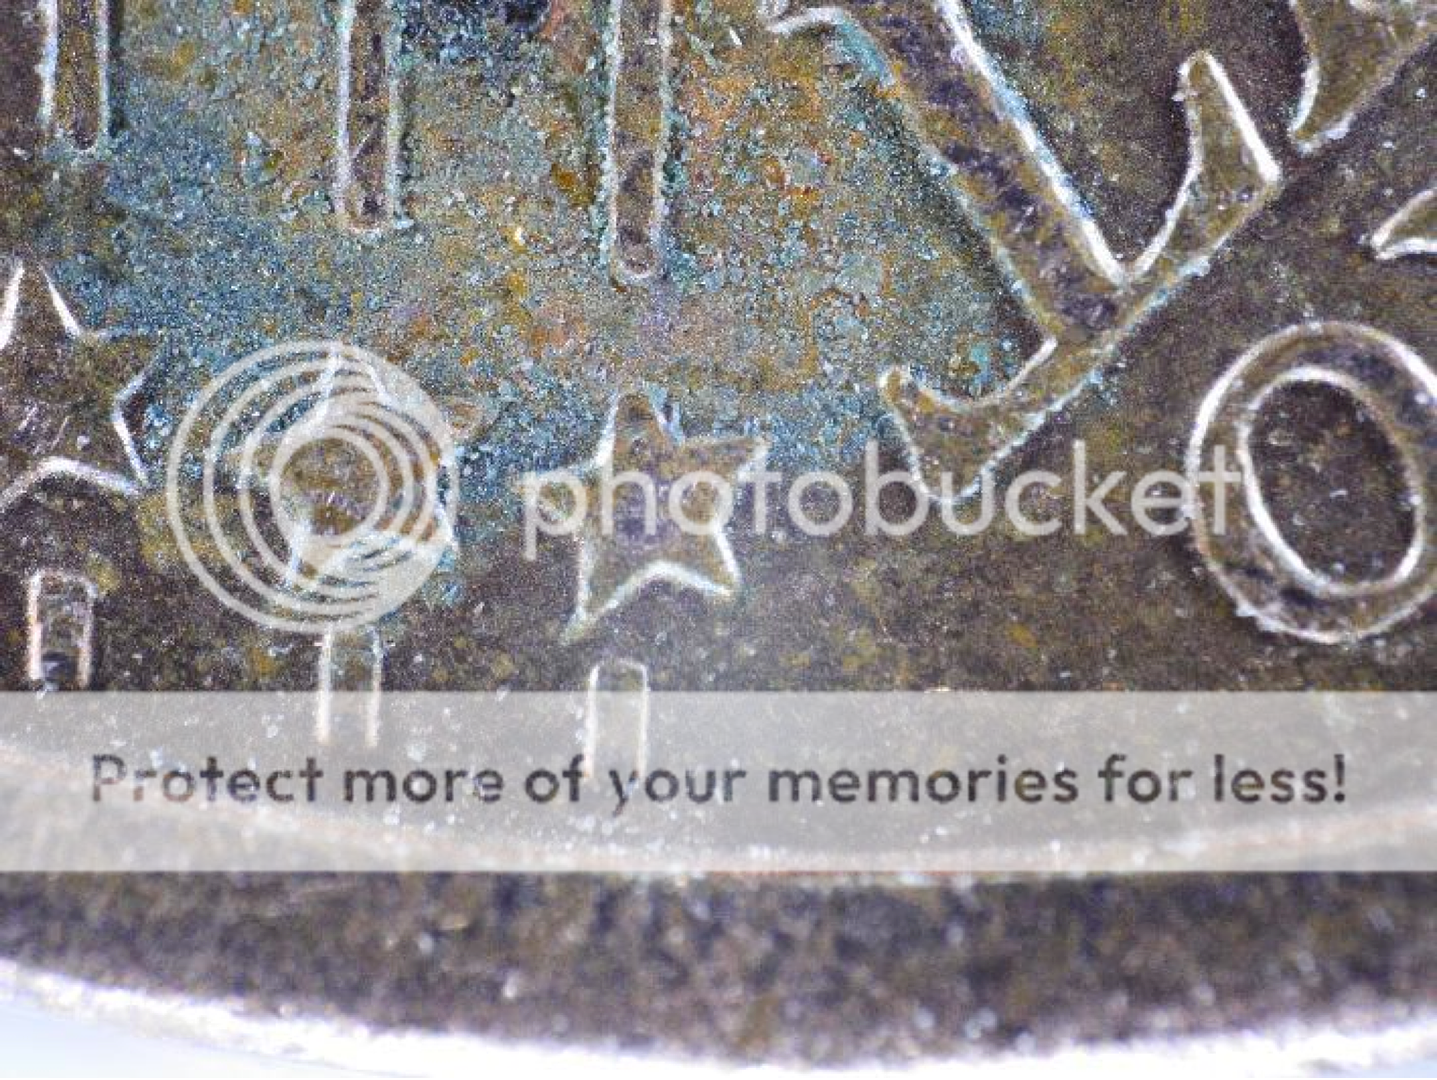
The above-mentioned vibrations from the tripod construction used here demanded tribute in that picture of the coin, which I unfortunately found only out about upon checking the images on the PC – so, just to make that clear, the blurriness is not a fault of the Nanoha!
This setup led me eventually to the idea of taking a closer look at a bank note. If you have a 5 Euros bill, take it out now and check out the tiny little stars from the EU flag – and be amazed, what the Nanoha made of them!!!

Being in the company of so much dough I became somewhat dizzy… and promptly had a seemingly brilliant idea!
For my first macro attempts once I had ordered a cheap set of macro extension tubes for micro4/3 from Hong Kong – how would the Nanoha behave in combination with these extensions? They are being made for normal lenses, not for the ones already having a 5:1 ratio…
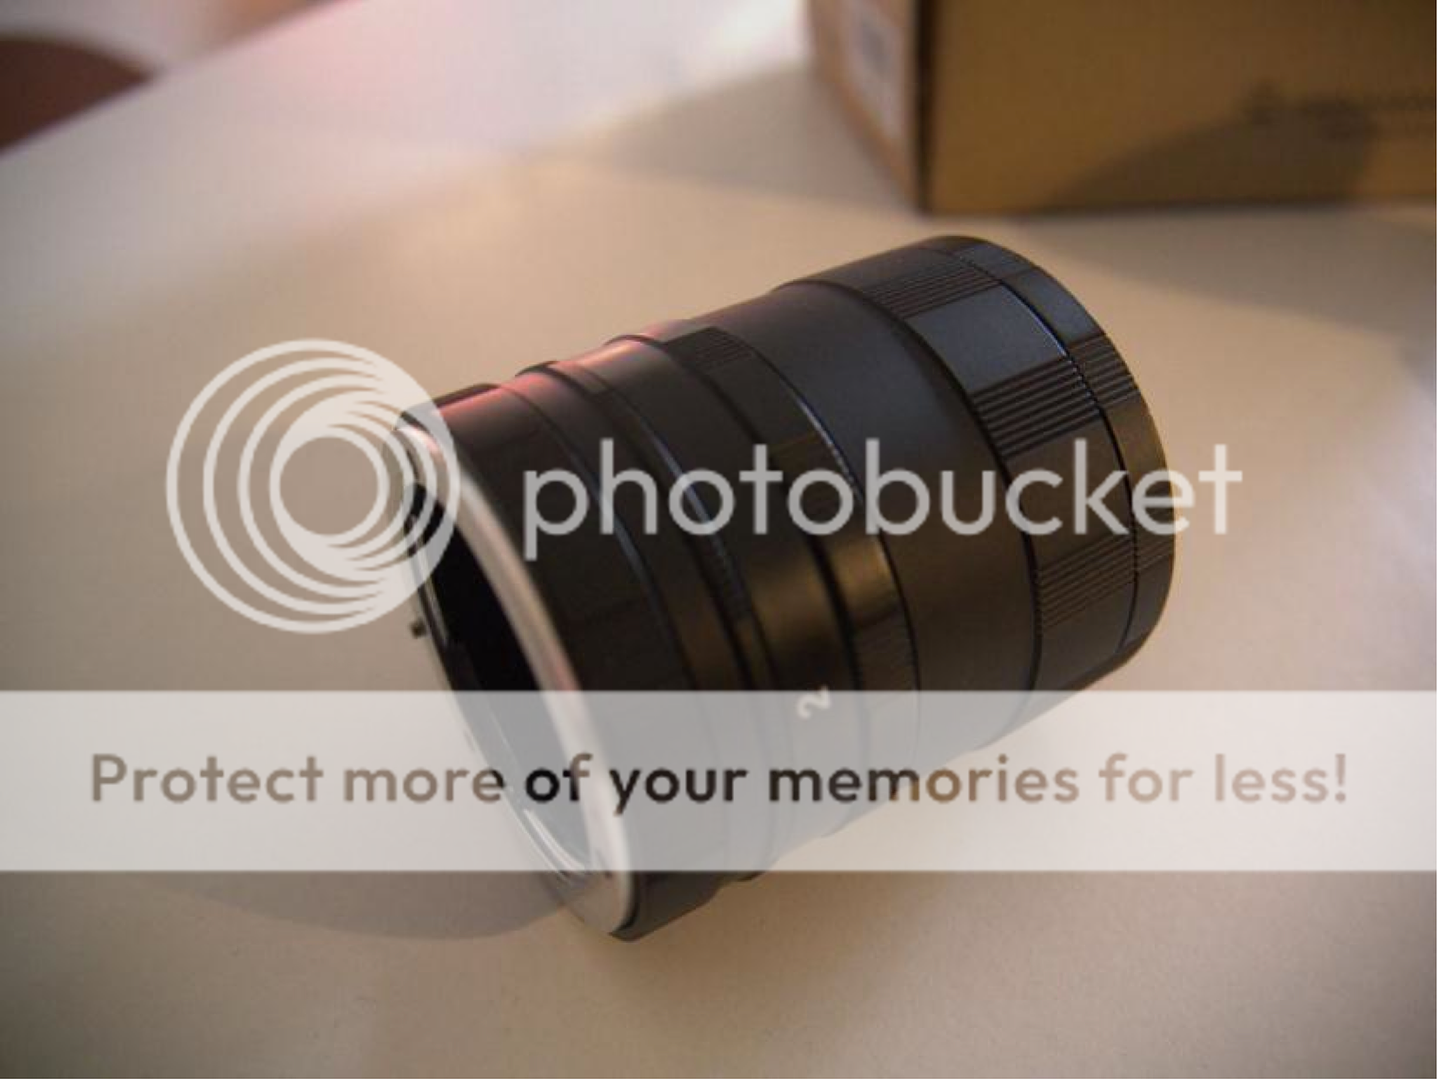
So, out with the thing, and let ́s have a test run, performed in baby steps.
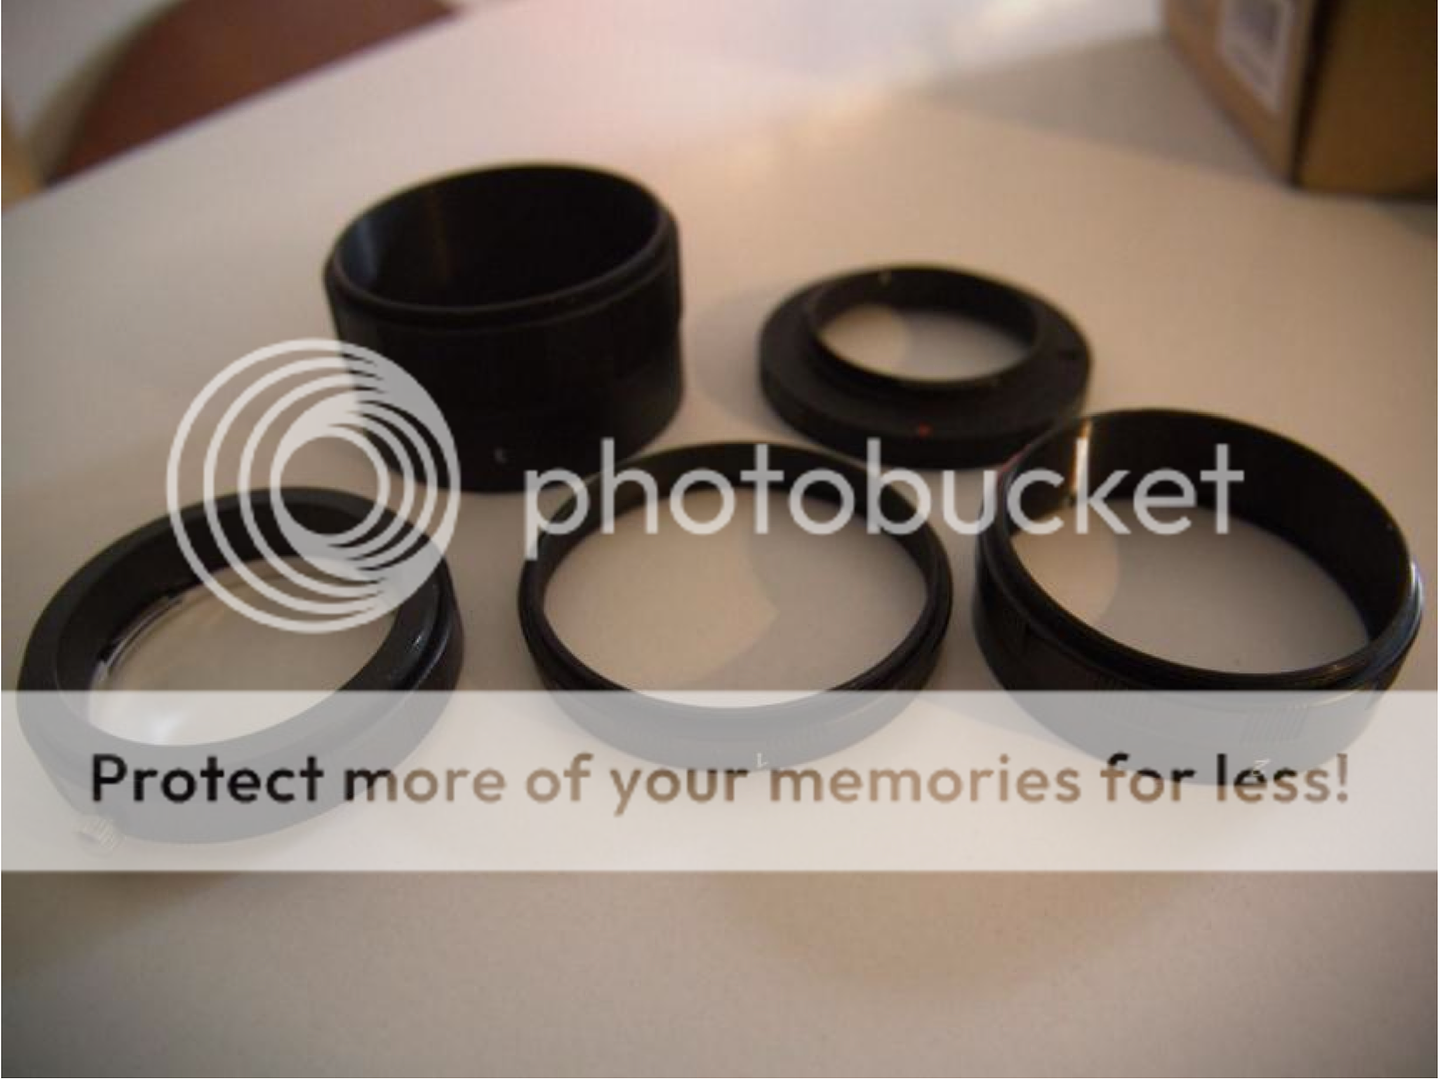
The tube consists of a base ring and three different extension rings (in an extremely cunning way marked with 1, 2 and 3). Then it finishes with the micro4/3 mount. All in all, the focal point is displaced by a maximum of 65 mm towards the front.
The overall set-up looks a bit menacing … and THAT I definitely would not just place on the table by itself. Despite the microvibrations, here I liked a version with the tripod much better!

And now comes the surprise of the day!
CLEARLY USABLE WITHOUT TOO MUCH QUALITY LOSS – and an accordingly higher magnification ratio with these macro extension rings!
As proof, here are three consecutive images of the same bill. And just compare them with the two and a half stars above, taken by the Nanoha alone!

This was the Nanoha with the 1x extension ring. Here follows the Nanoha with 1x and 2x screwed together as extension:

And let ́s have one at maximum magnification, the Nanoha plus the 1x, 2x and 3x extension rings together, as seen above in the setup picture:

Again: These are unaltered, out-of-camera JPG ́s, no sharpening, nothing, with a vibrating tripod. You can see the fibers of the bill! I think, this is amazing for a POCKETABLE tiny little micro4/3 lens!
I tell you though, even with focus magnifier it is difficult to set it up sharp, the tiniest movement around you reflects on the screen, it made me almost seasick when focusing…
And one more for the road… here is the top-right corner of the 5 from the bill, as comparison:

A good kitchen always invites you to experiment, so I went on a hunt for other interesting subjects. First, I have found a few grains of salt…

(A little bit of dirt on the sensor, sorry for that)
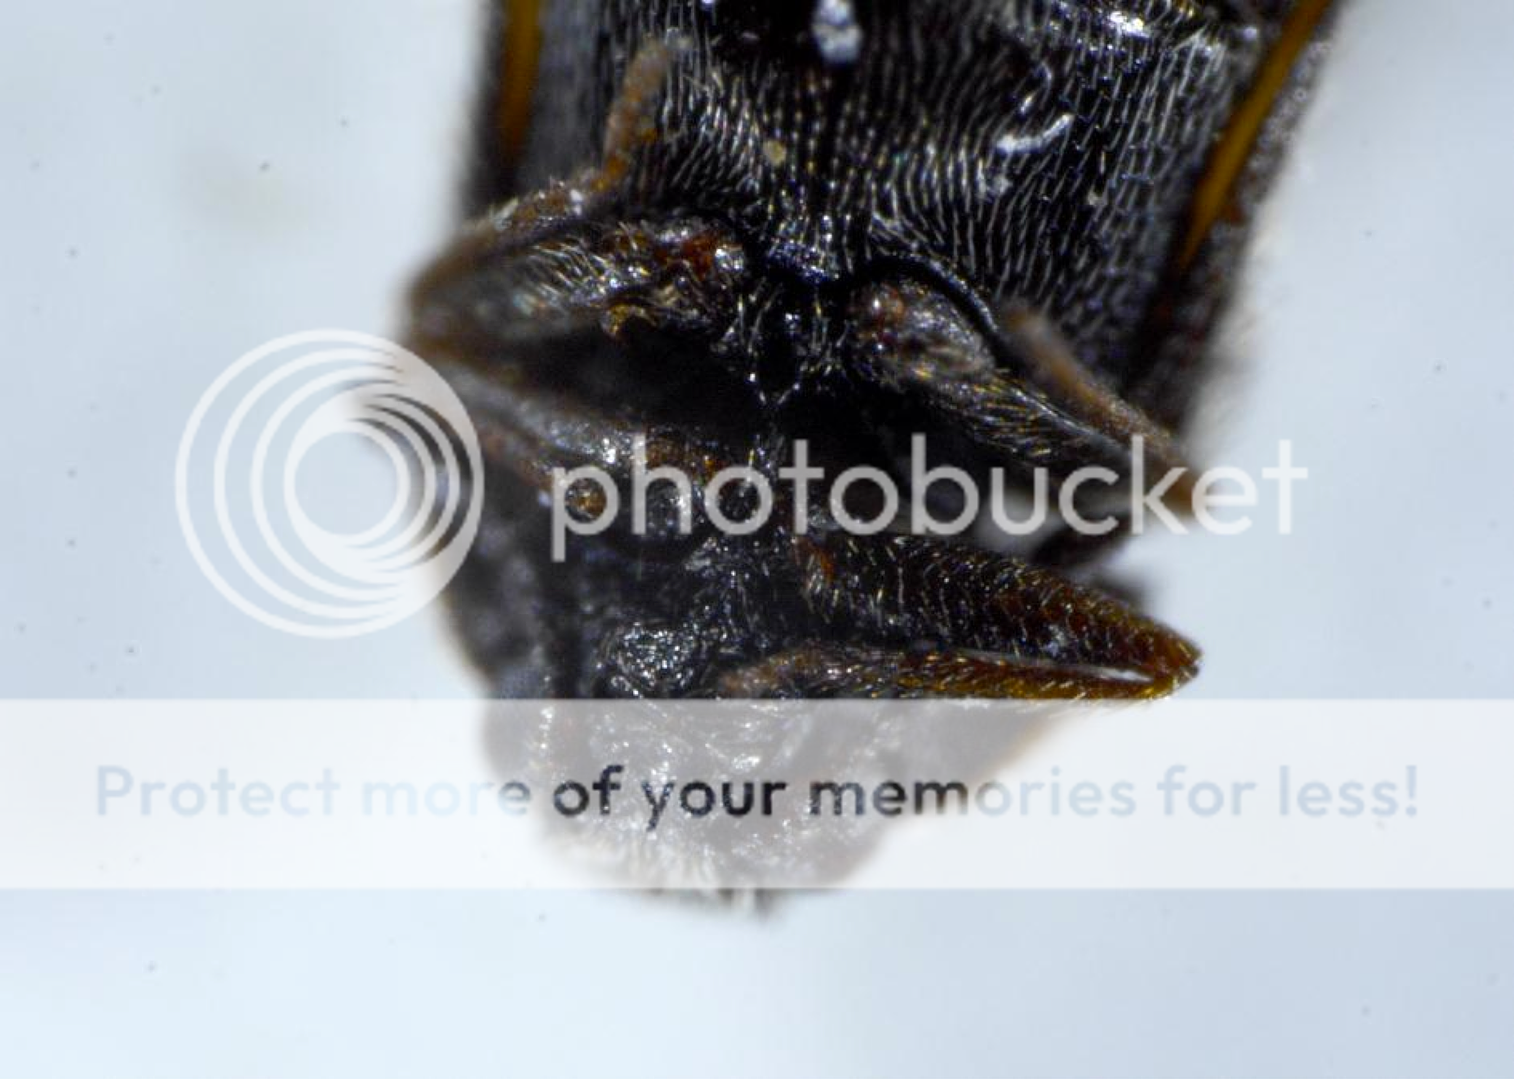
Then I found this little fellow near the window. No harm done by me, he was already in Valhalla, so here it comes. I don ́t know what species we have here, but all in all the bug was about 1 mm long.
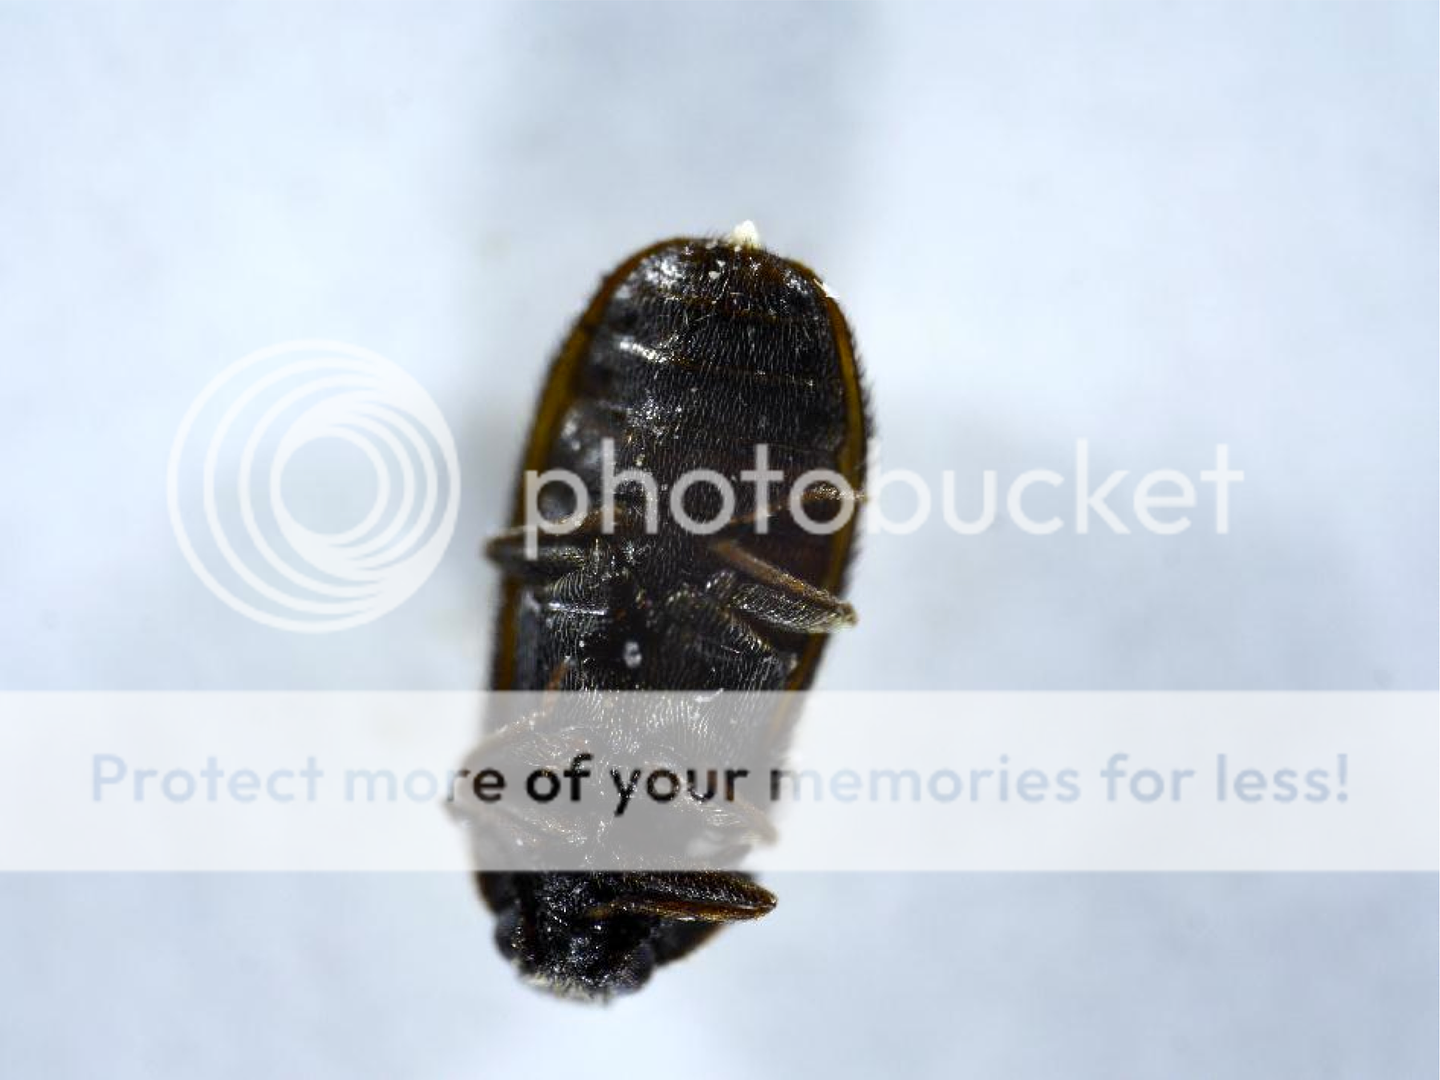
With the extension rings I even shot a close-up:
This gave me the idea of stacking. I wanted to do pictures with thorough sharpness – the best way to achieve that is by blending different pictures of the same image together, leaving always the sharpest part visible. Sounds interesting, and also sounds like much trouble in Photoshop, but fortunately there are good programs out there to do the job for you
One I can absolutely recommend is CombineZP, above all a Freeware and easy to use. You just give the software several images with different parts being sharp, and CombineZP will give you the result. The more “steps” (e.g. images) you have, the better your end result will look – and the more time this whole imaging process will take!
Here is the result of stacking 11 images, again from a fellow already out of business – a fly, this time. (And yes, I do recall that movie with Jeff Goldblum, lol…)

To give you an impression on the process, here are the first and last images of the set:

Again: the more images you have, the better your result.
I will close the picture session with one more stacked image courtesy of the Nanoha, a close-up of simple bread. Think about 1-2 millimeters of it:

CONCLUSION
Well, what can I say – I’m very impressed!
It is certainly not a typical lens for, let ́s say, weddings… But as a little, pocketable macro (or micro?) lens, I find it exceptionally well-constructed and made! The Yasuhara Nanoha delivers sharp, very bright images and therefore provides a lot of fun. I think it is a perfect addition to the already wide range of lenses available for system cameras and it can even give owners of good Canon, Sigma, etc. macro lenses the willies when it comes to versatility, size and price! This lens comes from the heart – and it definitely found its way to mine
A data sheet is available at yasuhara.eu, and if anyone is interested in buying one, also check out the yasuhara.fr page of Thierry I mentioned, as he was initially responsible for all the fun I had and have with the Nanoha.
Roberto
P.S.: Contact the author or make Paypal donations at roberto23@web.de. All images © 2013 roberto23@web.de – Yasuhara Nanoha is a copyrighted trademark, used here only to review the lens.