Whitby Goth Weekender (Damian McGillicuddy).

The following article is a guest post by Damian McGillicuddy. Reminder: You can write articles for 43rumors by sending text and images at 43rumors@gmail.com. Thanks!
——————————
Whitby Goth Weekender
by Damian McGillicuddy
It was a real privilege for me to “kick off” the new experience days for Olympus and the Olympus user magazine. The first one found me in Yorkshire at the Whitby Goth weekend!
Whitby is a beautiful seaside village that twice a year sheds its pleasant seaside image and becomes a mecca, for goths, steam punks and all-sorts of assorted fantasy wardrobe adventures! In truth though I didn’t know just how popular the event would be and Whitbys beautiful, cobbled, narrow streets seemed at times to be very near bursting at the seams.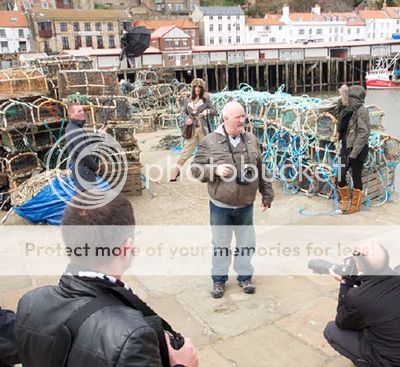
One of the big advantages of my OM-D kit is its compact and logistically friendly form factor, this meant that two small Clik Elite backpacks carried everything Steve (my assistant) and I needed to have a SIX light studio with us.
As is often the case in my world once we’d got to our location and saw the intel on the ground, so to speak, are plans had to change. The challenge with the goth weekend was simply the crowds and lack of space!
So not to infringe on the other visitors to wonderful Whitby this meant we had to abandon our usual approach and par down our kit even further. There was no way we would get my 36” multi modifier through the crowds and I was conscious that I didn’t want to accidentally knock off one of the steam punks top hats, my day would have been cut short quick if that had happened, and I may have even faced the scary thought of looking down the multi barrels of Professor Joshua Caruthers coal powered gattling cannon!!!
Seriously, it meant that my modifier of choice became the “Classic” award winning McGillicuddy 19” collapsable beauty dish. I know lots of people like to use bare speedlights and their is a place for this, I personally prefer to have a smoother transition between shadow and highlight that is easily achievable with the right modifier. The dish marries up to lots of light sources but my illumination for these images came curtesy of Olympus FL50r speedlights, these are may favorites for simplicity of use. The speedlights were triggered by the very stylish and superbly performing flashwave 3 radio triggers.
The camera was obviously my beloved OM-D EM-5 and the lens was chosen dependent on the effect I needed to create for the shot, cropping compression etc.
My main aim for this Olympus “Experience” day was to share some of my techniques with the delegates and show them that minimum kit is capable of oh so much more than most “experts” suggest – most importantly the mission was to bring the fun back into photography.
A good image has many facets to its success beyond camera craft and lighting technique, composition, subject direction and styling are key. Now before you all shout out “Its ok for you with your creative team and huge budgets”, lets get the facts straight. Yes I have an assistant but as an amputee I’d have a “work buddy” whatever my profession and as for big budget my MUA / stylist put our Victorian adventurer look together for the princely sum of £44.99 from a charity shop… my advice always look for the opportunities and no problem becomes insurmountable.
Ok so here we go, the bit you all really want to know…
How was it done:
 This was from the set just before we broke for lunch… yep the brightest part of the day! On a commercial shoot I’d probably choose not to shoot at this time of day but as I had 10 eager delegates in tow it would have been churlish not to.
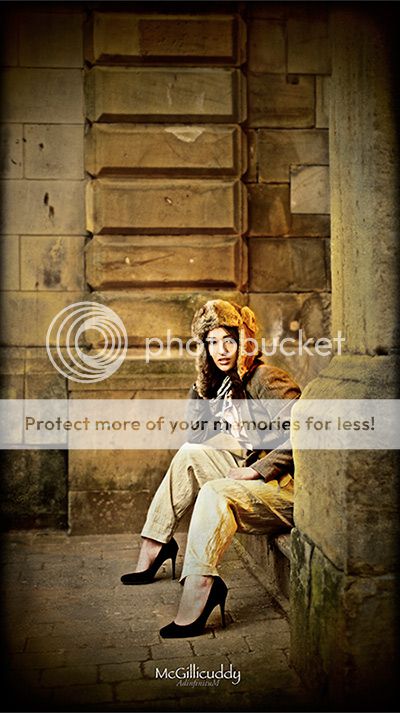
I used the location to my advantage and selected the lobster pots as interesting background texture. there was also enough space to stand Mischkah away from the background to help with isolating her as my focal point. This also meant I’d be able to drop the background slightly out of focus If I could use a longish lens. This was shot on the 45mm f1.8 – a 90mm equivalent in full frame terms.
The ambient illumination measured F5.6 and 6 1/10ths so I knew that if I positioned the subject so the sun was the “key” light I only needed about 3/4+ of a stop of artificial flash light to control the direction and shadow on the subjects face.
I had Steve remove the outer diffuser or “sock” from my beauty dish and tape a CTO (colour temperature orange) gel over the flash tube – but more of this later.
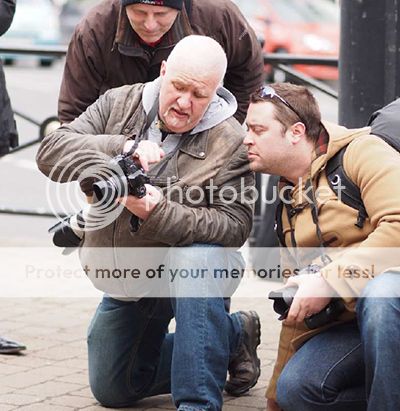
As you can see from my behind the scenes image, Steve used one of our Manfrotto baby lightweight stands to boom the dish out and above the subject to create the direction of light needed, removing the sock ups the contrast in the light giving a crisper image and making it a little more “sun” like.
To stand Mischkah off the background further I introduced two additional FL50r’s into the image and used them as accent lights to separate her and “carve” her out from the background. The accent light to camera left ran two stops above the key and the speedlight to camera right just the one.
Ok so what about the CTO ( this stands for Colour Temperature Orange) mentioned earlier. By fitting this in front of the key lights flash tube we turn it into a tungsten balanced light source, ie its a warm orange in colour when shot at a daylight balanced 5600 degrees kelvin. Now here is the interesting bit. If we manipulate the cameras white balance to believe it is shooting a tungsten light source, in other words to neutralise the orange colour, the day light and the daylight balanced flash take on a cooler, bluer, ethereal glow… this is one of my favorite tricks to add impact. The effect can be dialed up and down as the colour of the light, the degrees Kelvin, is altered on the camera. Its a very effective trick!
The image was captured at 200th of a second at f9 with the custom white balance temperature set to 3200 degrees kelvin – I shot in the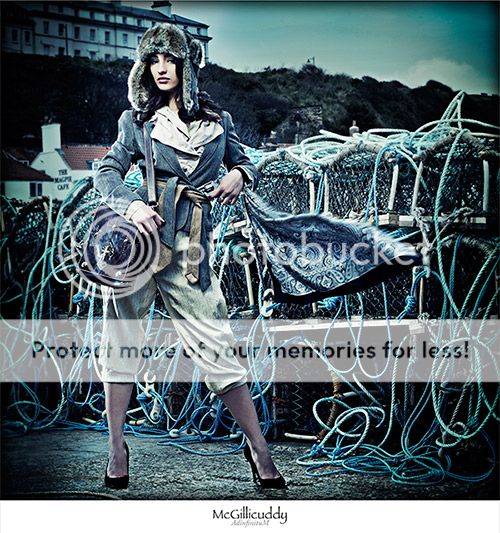 square crop mode so I could maximise every pixel within the composition
What about post? Simple really – apart from clearing skin and ridding the image of stray hairs, I tend to do as little as possible. Please don’t get me wrong every image requires a little bit of post but I’m a photographer not a digital artist so I like to get as much done in camera as possible. Most of the work is done for me by gelling the lights and manipulating the cameras white balance. In Aperture I did a little dodge and burn then desaturated the image. I then added a very slight blur vignette and my favorite OnOne filter – edges to black.
Thats it, lots of impact for very little effort.
The second image I’ve chosen to highlight tells exactly the same story again, but from a slightly different perspective. In a strange way this photography is a little like Mexican food – a burrito is essentially the same as a fajita… just wrapped differently. So in this instance I’m using the same kit in essentially the same way… lets highlight the subtle differences for you. The outer sock diffuser is now back on the front of the 19” dish – this will soften the contrast of the light, giving a less crisp line between shadow and highlight. The “Key” light is also back to emitting daylight balanced flash as the CTO has also been removed. Its positioned to camera left and feathered to give a loop pattern to my light.
The CTO is still being used in the image however. Its now on our second FL50r that we are using as an accent light to create further separation – the orange colour just adds a further dimension. You can see from my behind the scenes image we approached this in a real down and dirty style forsaking the usual lighting stand for a more attractive model! This light is set at one stop over the key. Thats generally a good place to start then increase or decrease the power for effect.
I’m finding the OM-D to be a really helpful creative tool. The image was shot in the camera as a 16:9 ratio and to give myself a little creative edge I used the art filter “pin hole” to capture 80% the look straight in camera… every little helps in the creative pro’s day ;0)
So what about post?
Usual post applies but this one again had a tiny tweak of desaturation and a touch of “Edges to black” curtesy of OnOnes perfect photo suite 7.
I’ve got to say I had an absolute blast and was delighted with not only the results captured on the day but the fantastic company and enthusiasm of the delegates. There are lots more olympus days planned you can keep up with my news at www.damianmcgillicuddy.com or check out the latest in “Wow” or “Experience” days by going HERE
To me this is both evolution and revolution… I LOVE shooting with the OM-D and I look forward to sharing the details of my next shoot with you in due course.
ttfn
McGillicuddy